[Solved] How to install MySQL Server 5.7 on Ubuntu 20.04 LTS (Focal Fossa)
UBUNTU 20.04 code named Focal Fossa is available for the general users and can be installed on anything physical or virtual. This is a pretty awesome operating system which gives liberty to the users to perform beyond limits. MySQL and Linux are old partners and they are very comfortable with each for the installation, configuration and management. You can install MySQL on Linux with quite a few commands and it will start working in no time. As you know that MySQL Server 5.7 is getting very older but its still popular in many applications. There are multiple ways available in UBUNTU 20.01 LTS (Focal Fossa) release to install any application like MySQL 5.7. APT-GET is the most popular way to install any application. The problem is, it will install the most recent version of MySQL available in repository. I found an easy way to install legacy versions of MySQL Server on UBUNTU 20.04 (Focal Fossa) with very few commands. So here are the instructions to install MySQL Server 5.7 on UBUNTU 20.01 LTS (Focal Fossa).
Remove any version other than MySQL Server 5.7
Please follow the under listed instructions to remove any version already installed on your system to make sure that nothing interfere with the installation process. Commands are given as under, take care of the sequence.
sudo apt-get purge mysql-server mysql-client mysql-common mysql-server-core-* mysql-client-core-*
sudo rm -rf /etc/mysql /var/lib/mysql
sudo apt-get autoremove
sudo apt-get autoclean
Just copy and paste the above commands on UBUNTU terminal and everything else will be done automatically.
Now we need to download and install the under listed package so that we can select the installation repository.
wget http://repo.mysql.com/mysql-apt-config_0.8.10-1_all.deb
sudo dpkg -i mysql-apt-config_0.8.10-1_all.deb

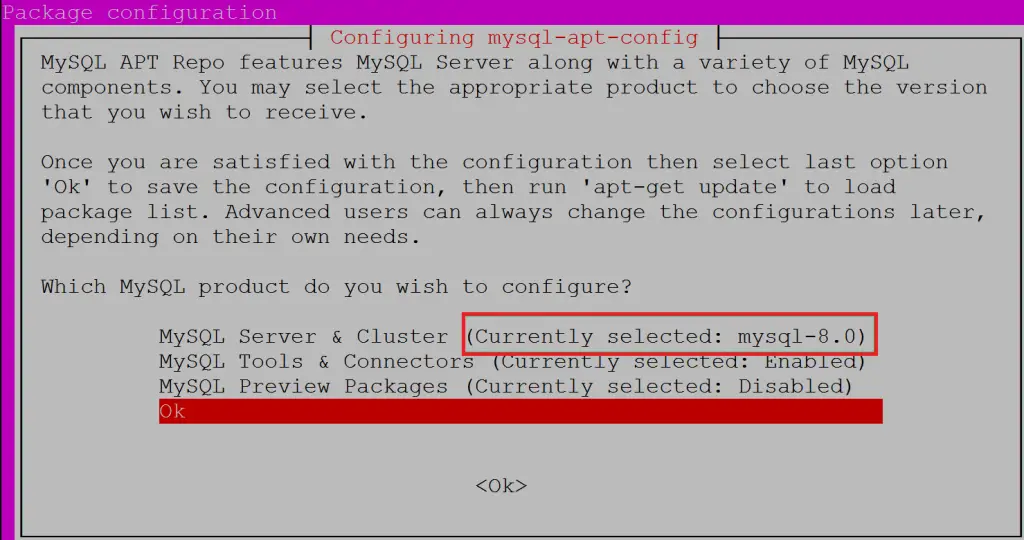
Please choose the option “MySQL Server & Cluster (Currently selected: mysql-8.0)” from the list and press Ok.
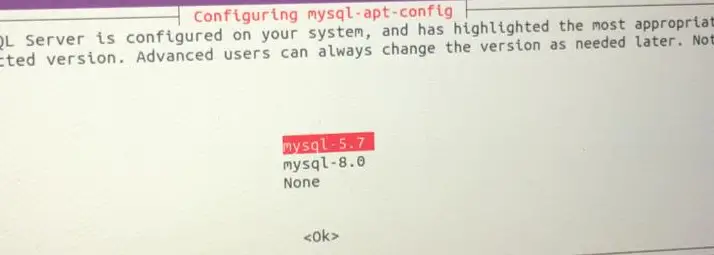
On next screen the option will be given to choose between MySQL 5.7 and MySQL 8.0. Select MySQL5.7 from it to complete the installation of MySQL 5.7 on UBUNTU 20.04 LTS (Focal Fossa).
Once done with the selection press OK to finish this command (choose the strong password for MySQL Server 5.7) and execute the under listed commands on order:
sudo dpkg-reconfigure mysql-apt-config
sudo apt update
sudo apt-cache policy mysql-server
sudo mkdir -p /etc/mysql/conf.d
sudo apt install -f mysql-client=5.7.30-1ubuntu18.04
sudo apt install -f mysql-community-server=5.7.30-1ubuntu18.04
sudo apt install -f mysql-server=5.7.30-1ubuntu18.04
Once the installation is completed successfully, you need to create under listed file to add the configuration items:
sudo vi /etc/apt/preferences.d/mysql
press insert button to add under given text in vi editor.
Package: mysql-server
Pin: version 5.7.30-1ubuntu18.04
Pin-Priority: 1001Package: mysql-client
Pin: version 5.7.30-1ubuntu18.04
Pin-Priority: 1001Package: mysql-community-server
Pin: version 5.7.30-1ubuntu18.04
Pin-Priority: 1001Package: mysql-community-client
Pin: version 5.7.30-1ubuntu18.04
Pin-Priority: 1001Package: mysql-apt-config
Pin: version 0.8.10-1
Pin-Priority: 1001
Press escape button and enter :wq! command to save and exit the vi editor.
MySQL Server 5.7 is successfully installed on your UBUNUTU 20.04 LTS (Focal Fossa) operating system.

I really love ya, you save my life!!!