How to search in windows 11 (4 Ways Explained)
Finding a file could be very hectic sometimes. You just forgot the file location or in some cases even the file name. Still no worries, there are many possible ways to find it in windows 11. In this article, we will get to know how to find a lost/misplaced/forgot file by multiple methods of search in Windows 11.
1. Looking at common places of windows 11
Common places are given the priority to check because its quick and less hectic. There is a great chance that you may find your desired file in one of these locations. Common places to look upon are:
Default folders
If you don’t remember the file location where you saved it most chances are you didn’t name or choose any specific location. So in that case windows save the file in the default folders. For example, if it is a document file it could be found in the document folder. Same is the case with pictures, videos and music files as well. It could also be in the libraries folder. Most of these keys could be found on the left of the file explorer. Recent files might also contain the desired file if you have opened it recently. For further demonstration refer to the saerching section of the artical .
Downloads
If you have downloaded your file from the internet irrespective of the file type there is 90% chance that you will find it in the downloads folder. All the downloaded files are placed by default in this folder by the windows.
Last edited application
You may also check the application where you last time edited your file. It could be word, excel or any photo video editing software.
Recycle Bin
The last most probable place where you may find you file could be recycle bin. Possibilities are that you may have deleted your file accidently and couldn’t remember now. So it wouldn’t be a bad idea to check recycle bin.

2. Searching for files using extra options
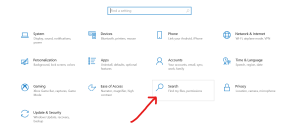
Now if you haven’t found your desired file yet no need to panic. There are still some good ways to dig it out. Searching can make it look easy. Before using the search option, you need to check whether all your files are indexed. For this you need to go to settings then go to search settings.
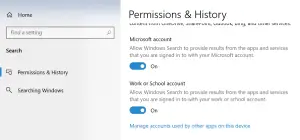
In the if you use one drive check if the cloud content search options are enabled in the permission and history section.
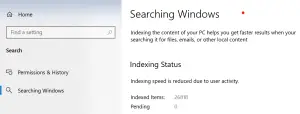
Now go in the Searching windows option and check if all the items are indexed or not. All the items should be indexed in order to make a search covering all the computer files. If they are not indexed go to advance search indexer settings and index all the files.
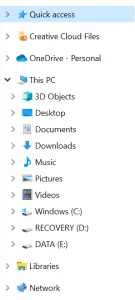
Now go to windows file explorer (shortcut: Ctrl+E). Here go to this pc (if you don’t remember the specific folder), this will include all the files on your pc as well as all the cloud files in case you use any cloud storage setup. Now go search tab in the top right corner (shortcut: Ctrl+F). In the search tab enter the related keywords. Now it will show you all the search results you can filter them out by going in the search tools option in the top left.

Here you get options like:
- Date modified (today, yesterday, this week, last week, last month etc.)
- Kind (document, program, task, calendar, email, picture etc.)
- Size (in which size range does the document falls)
The good thing is that the keywords you have entered not only matches the file name but also the content present inside the file.
After applying the filters, it is for sure that the searched files would be so less that you could eyeball them to check the desired file.
3. Advance query syntax to search in windows 11
The advance query syntax could prove to be much useful. Rather than typing in the search box and applying all the filters if we invest some time learning the syntax it would be worth it.
If you simply type modified:lastweek in the search box, it will show us all the files that were modified in the last week. Or we can make it even more specific by typing modified:>11/20/2022 giving us all the results for date greater then entered. To narrow even more in the search, we can use type:powerpoint in case it is a MS PowerPoint file you are looking for. Then if you remember the quantity of slides or even have any idea about it you can enter slides:>25 to go more deep inside the search and filter up to the desired destination.
Similar is the case if you are searching for any images. Just type kind:pictures. If you remember size a bit, you can also enter size:>7mb.
So we can see that by using the advance query syntax we can very easily filter up to the desired file.
For learning the advance query syntax, you can follow the link given: Advance query syntax
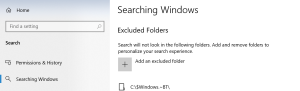
4. Excluded files
While using the search in windows 11, we can exclude some search results as well to get more precise results. Excluding files is helpful in the case we don’t want to include system files in the search results. Whatever folder or file you add in this section, it will show you results other than that.
This can be done by going into the search settings then into searching windows there excluded files.